Bastion UI
Bastion UI is a website for supervising Genvid clusters. It is a GUI for the bastion-api.
Settings page
This page is where you can change the Bastion-UI page configuration. You can also see and edit the Global Vars, Modules, and Backends.

Global Vars
The Global Vars Settings lets you set a variable that you can use for all Terraform clusters. Add the value here and every Cluster with settings that have the same name will inherit this value by default.
Modules Section
In the Modules section, you will find the existing Terraform module repositories that you can edit or remove. Click REFRESH to update the modules in the repositories.
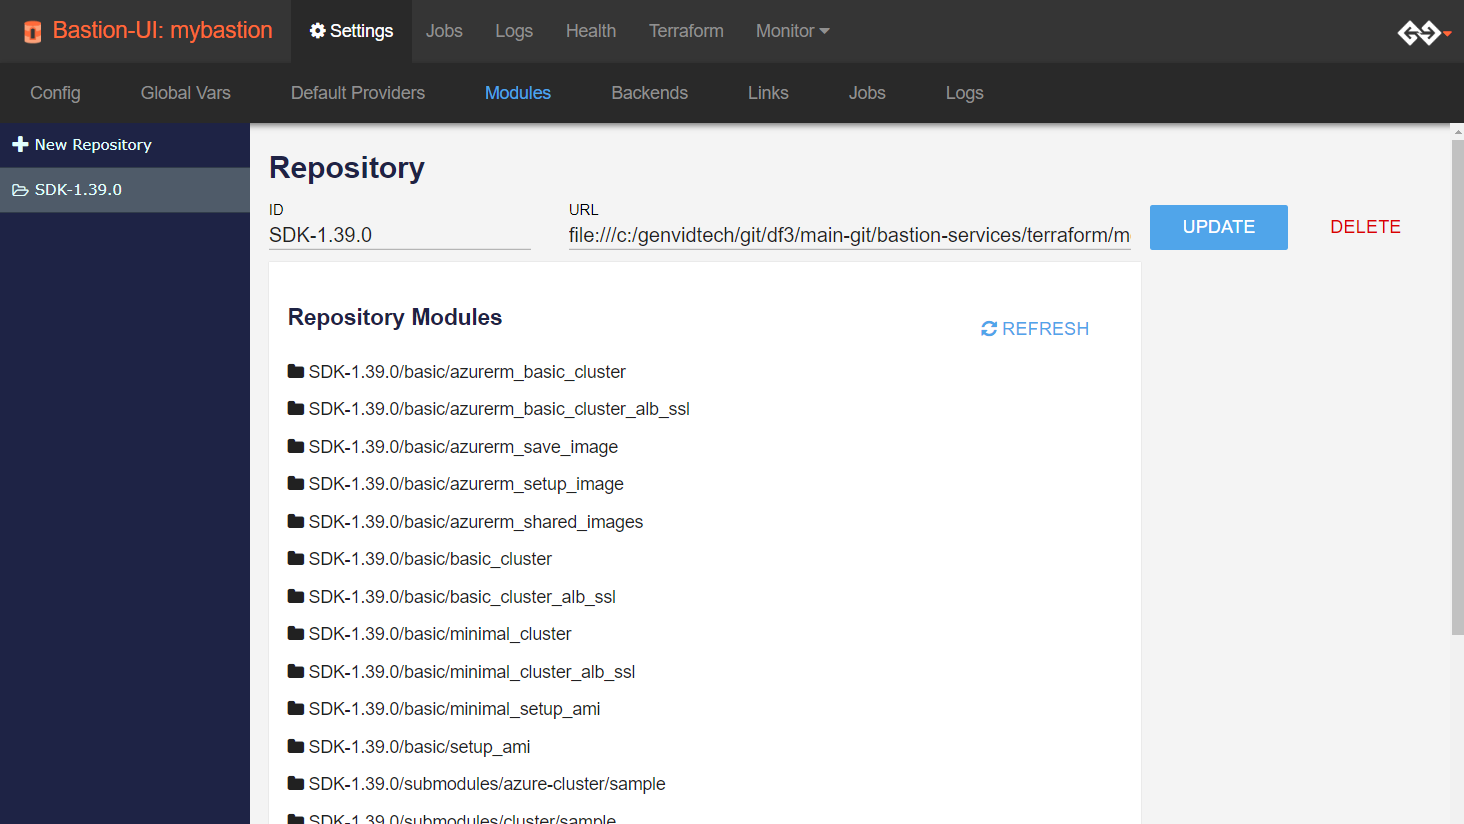
Click + New Repository to create a new repository.

- ID
The repository folder-name in all lower-case characters.
- URL
The URL of the folder where the repository exists.
Backends Section
In the Backends section, you can see the list of available backend configurations. A backend configuration is composed of its unique name, a type, and a list of variables. From here you can:
Add, edit, or remove a backend configuration.
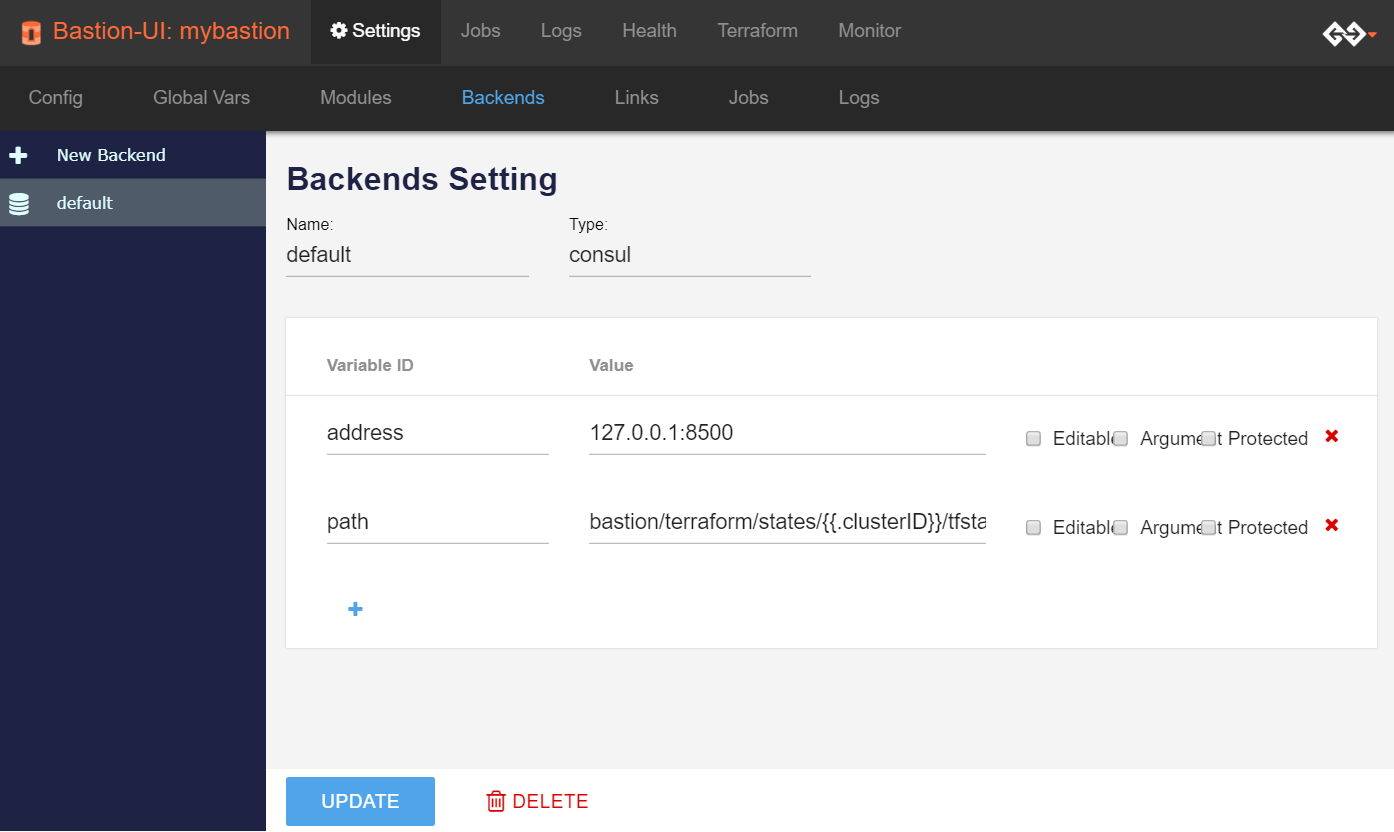
- Name
A unique ID for the backend.
- Type
A valid Terraform backend type.
- Variables
The arguments for the backend type, which the user can add or remove. A variable is composed of an ID, value, and a few properties.
Variable ID: The argument name.
Value: The argument value.
Editable: If the argument can be edited when initializing a cluster.
Argument: If the variable is configured by a file or passed to Terraform as an argument.
Protected: If the variable is shown as a password when initializing a cluster.
See also
Terraform’s Backends for documentation on Terraform backends.
The bastion-api applies interpolation to the variable’s value before
initializing a cluster. For example, the text {{.clusterID}} would become
the clusterID. For now, only clusterID, clusterUUID, bastionID,
and instanceID are supported.
Terraform
This page displays all the Terraform configurations deployed. From here you can:
Start or stop the cluster-api.
Access each cluster’s specific Cluster-UI page if the cluster-api is started.
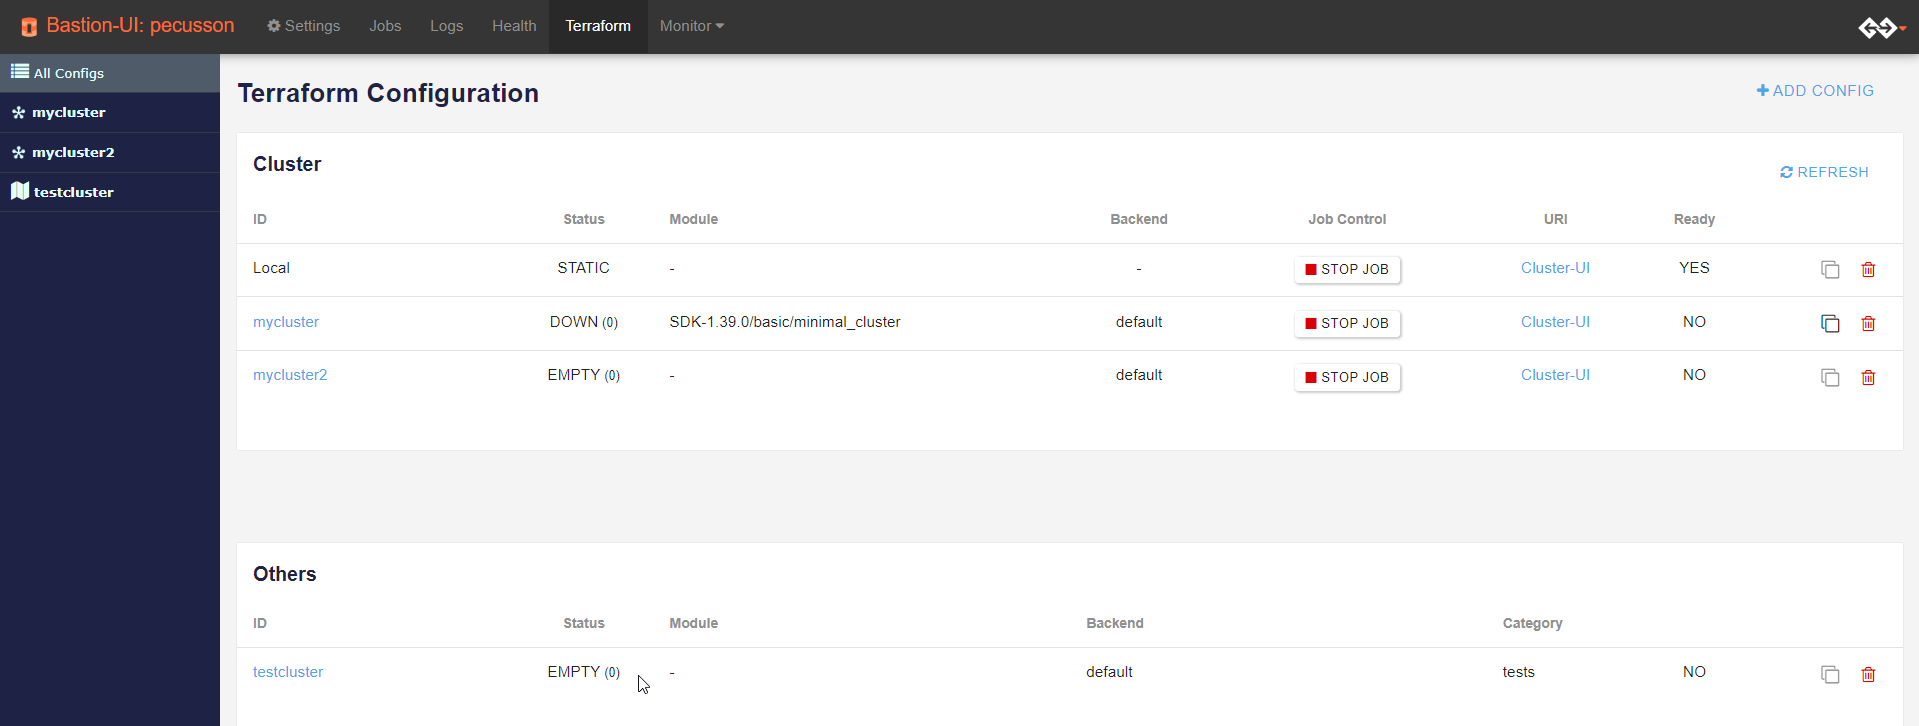
The page displays this information for each cluster:
ID
The identifier of the cluster.
Status
The status of the cluster:
VOID: Cluster doesn’t exist. The backend doesn’t have any record of a cluster with that ID.
ERROR: An error occured when checking the cluster.
STATIC: Cluster created and is static.
BUSY: A command is running.
EMPTY: The cluster was created but no module was loaded.
CONFIGURED: Temporary state while a module is being imported.
DOWN: A module was imported in the cluster but not applied or no resources were created for it.
UP: At least one resource was created for the server.
INVALID: Invalid or unknown status.
The status also has a number between parenthesis. This is the number of resources actually managed by the cluster as reported by Terraform.
Module
If a module was imported for this cluster, the name will be shown.
Backend
Backend used to hold the Terraform state.
Job Control
A button that will show Start Job if the cluster jobs are not started and Stop Job if they are started.
URI
A link to open the Cluster-UI.
Ready
This indicates whether the SDK was loaded in the cluster.
Copy icon
Click to clone the cluster configuration.
Trash can icon
Click to delete the cluster Terraform configuration and state. A pop up will appear if resources were allocated to warn the user against deleting a configuration with active resources.
Create a Terraform configuration
Click Add Config to open the New Config dialog.
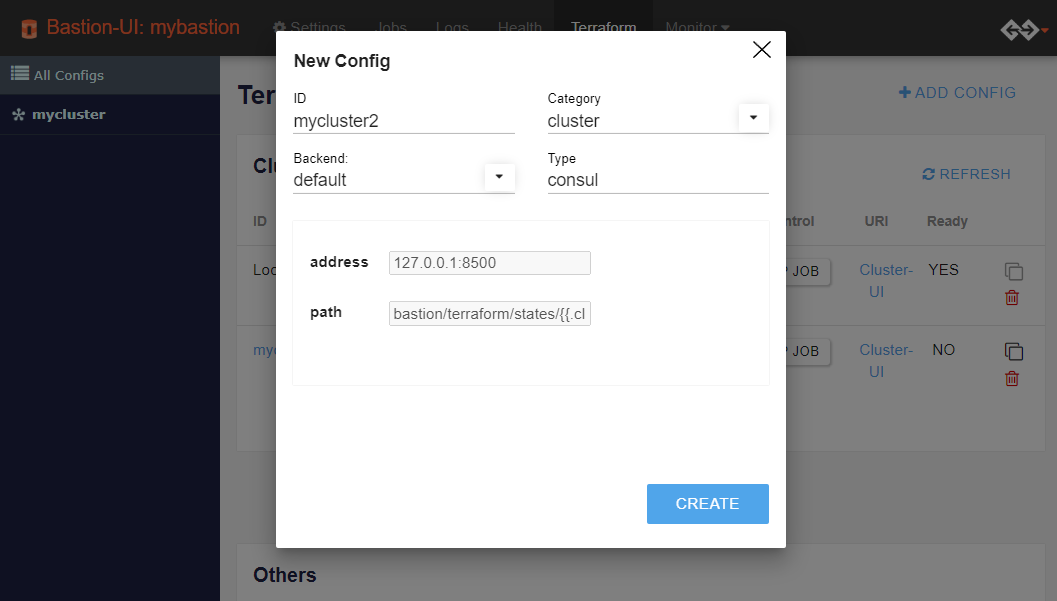
- ID
A unique ID for the cluster.
- Category
This helps the user identify what the Terraform configuration does. The default is cluster.
- Backend
The Terraform backend to use. The dropdown lists all available backends.
- Type
The type of Terraform backend being used.
- Variables
Additional variables for configuring the backend.
Import Terraform Module
Important
This step is required.

To initialize the Terraform configuration on the Commands page:
Select the appropriate module.
Click IMPORT MODULE.
The list by default only displays the modules that support cluster-api. Check Display all modules to see all available modules.
The selection of a module will be disabled after a module is imported. You can change or reimport a module by clicking on REIMPORT MODULE.
Terraform Commands
This page is where Terraform commands are executed after the configuration is initialized.
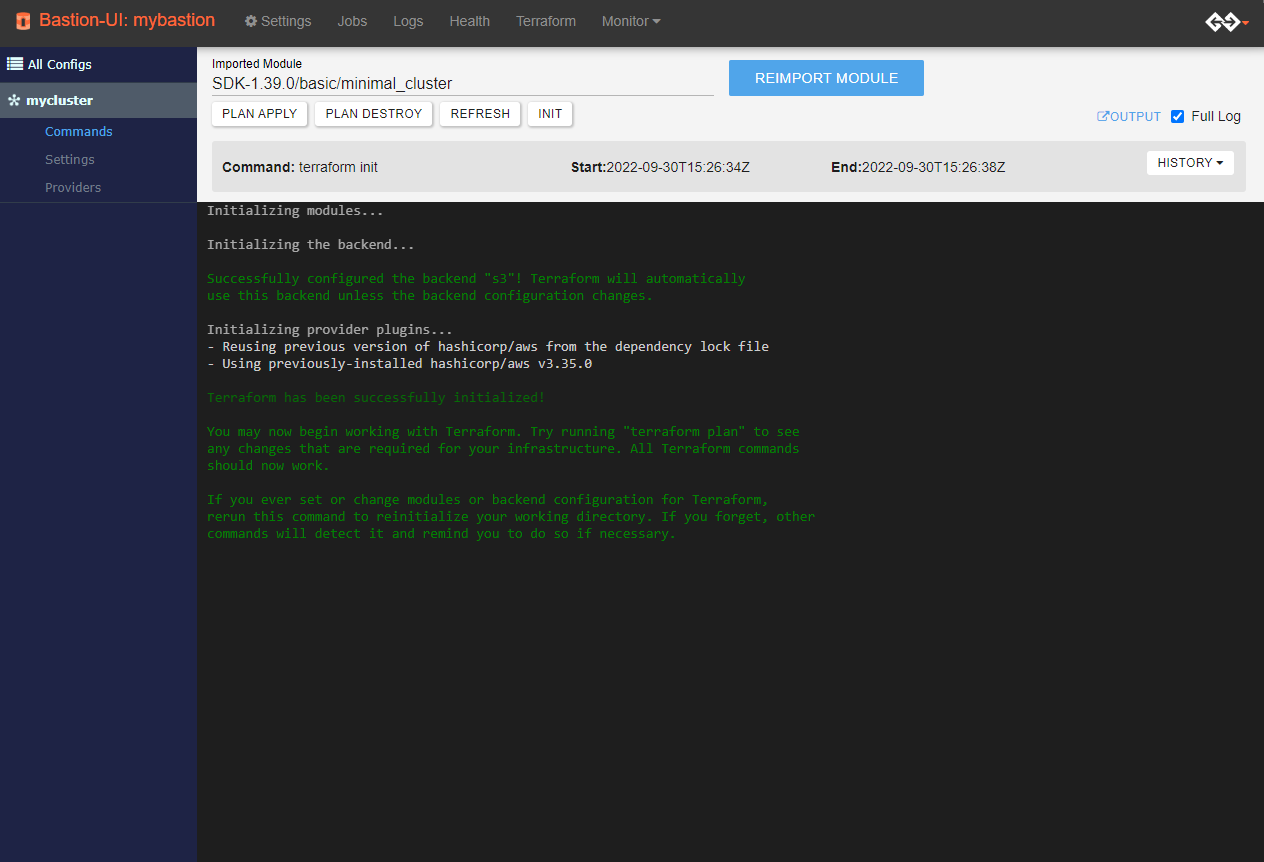
- Plan Apply
Perform terraform plan.
- Plan Destroy
Perform terraform plan -destroy.
- Refresh
Perform terraform refresh.
- Init
Perform terraform init.
- Output
Perform terraform output and show the result in another window.
You can terminate or kill a command while it’s running.
- Terminate
Send the terminate signal to the running command. Terraform will first try to gracefully shut down. On the second try Terraform will immediately stop the process. This may result in data loss.
- Kill
Kill the Terraform process immediately. This may result in data loss.
Terraform Local Settings
Terraform Settings is where you configure the variables Terraform needs to build an infrastructure. There are three types of values:
- Default
Default values come from the selected Terraform module.
- Global
Global values are set in Global Vars Settings. and override the default value for any variable with the same name.
- Local
Local values are custom values that override both default and global values.
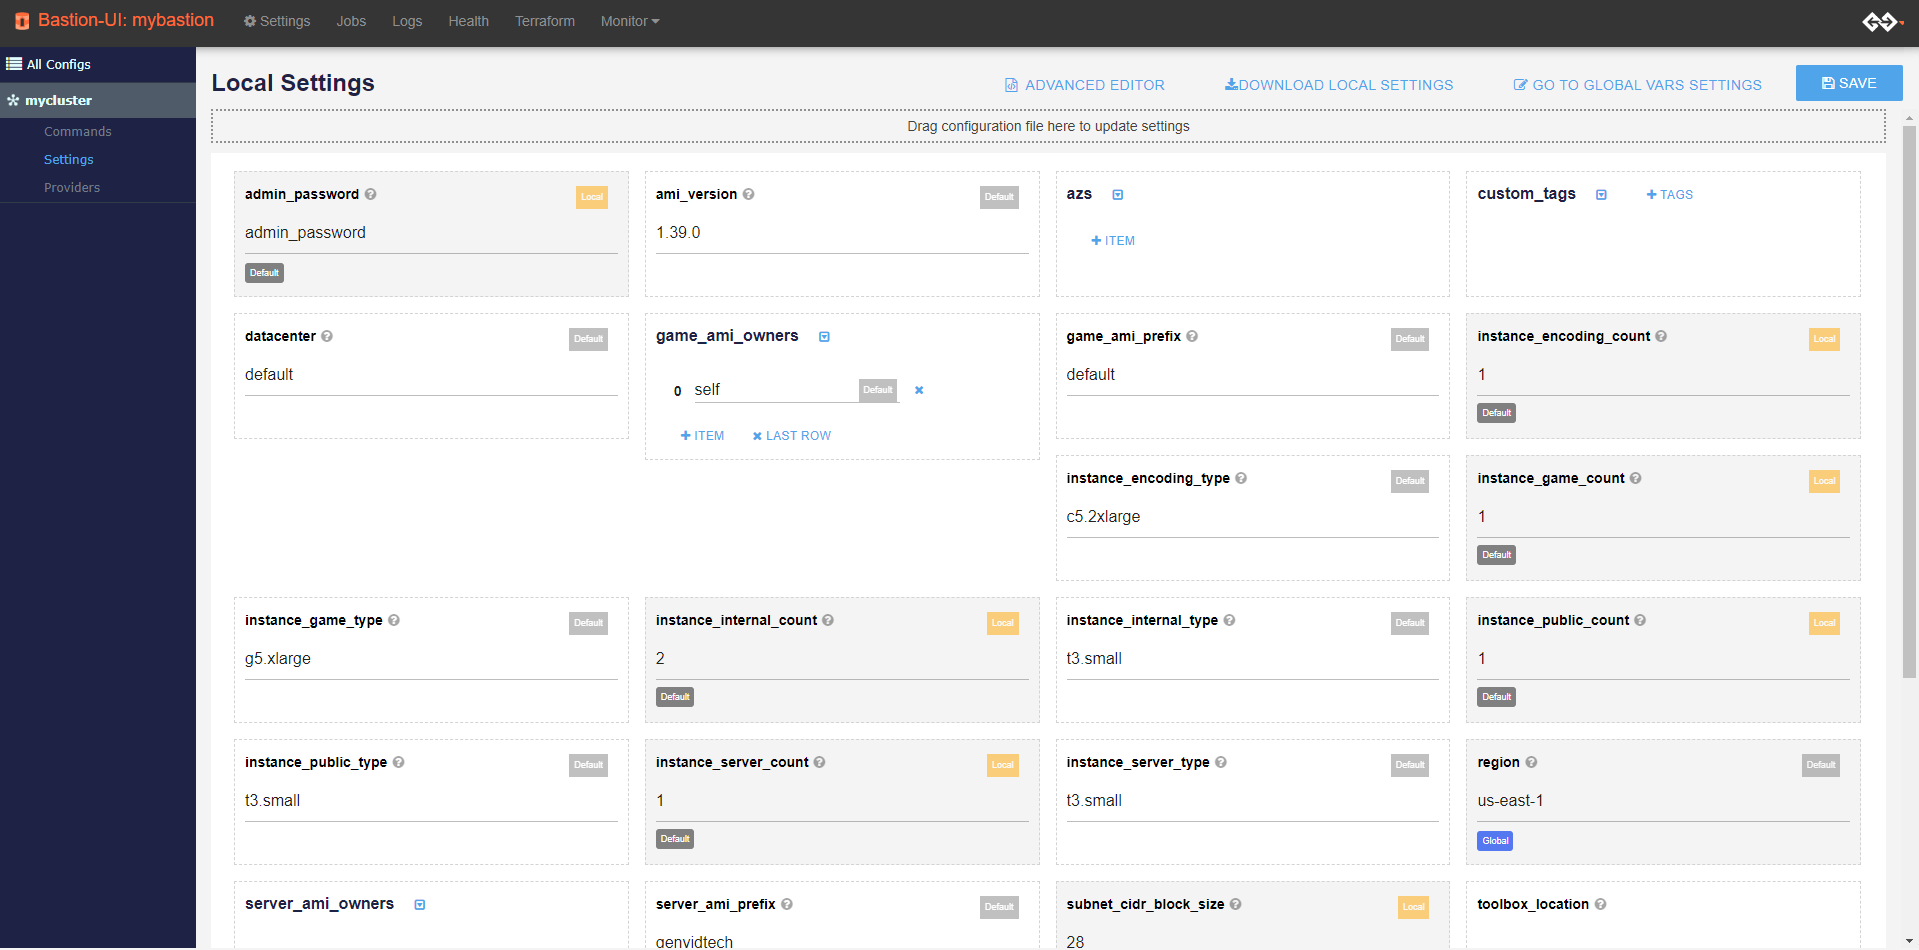
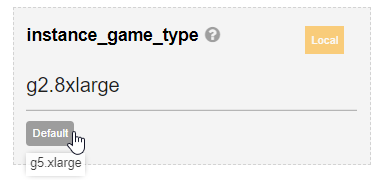
The label beside each variable tells you if its value is Default, Global, or Local. Click the buttons underneath to change the associated variable to either Default or Global.
Advanced Editor

For advanced users, there is an option to edit the settings through JSON editor as well. Clicking on Advanced Editor will display the JSON editor as follows.
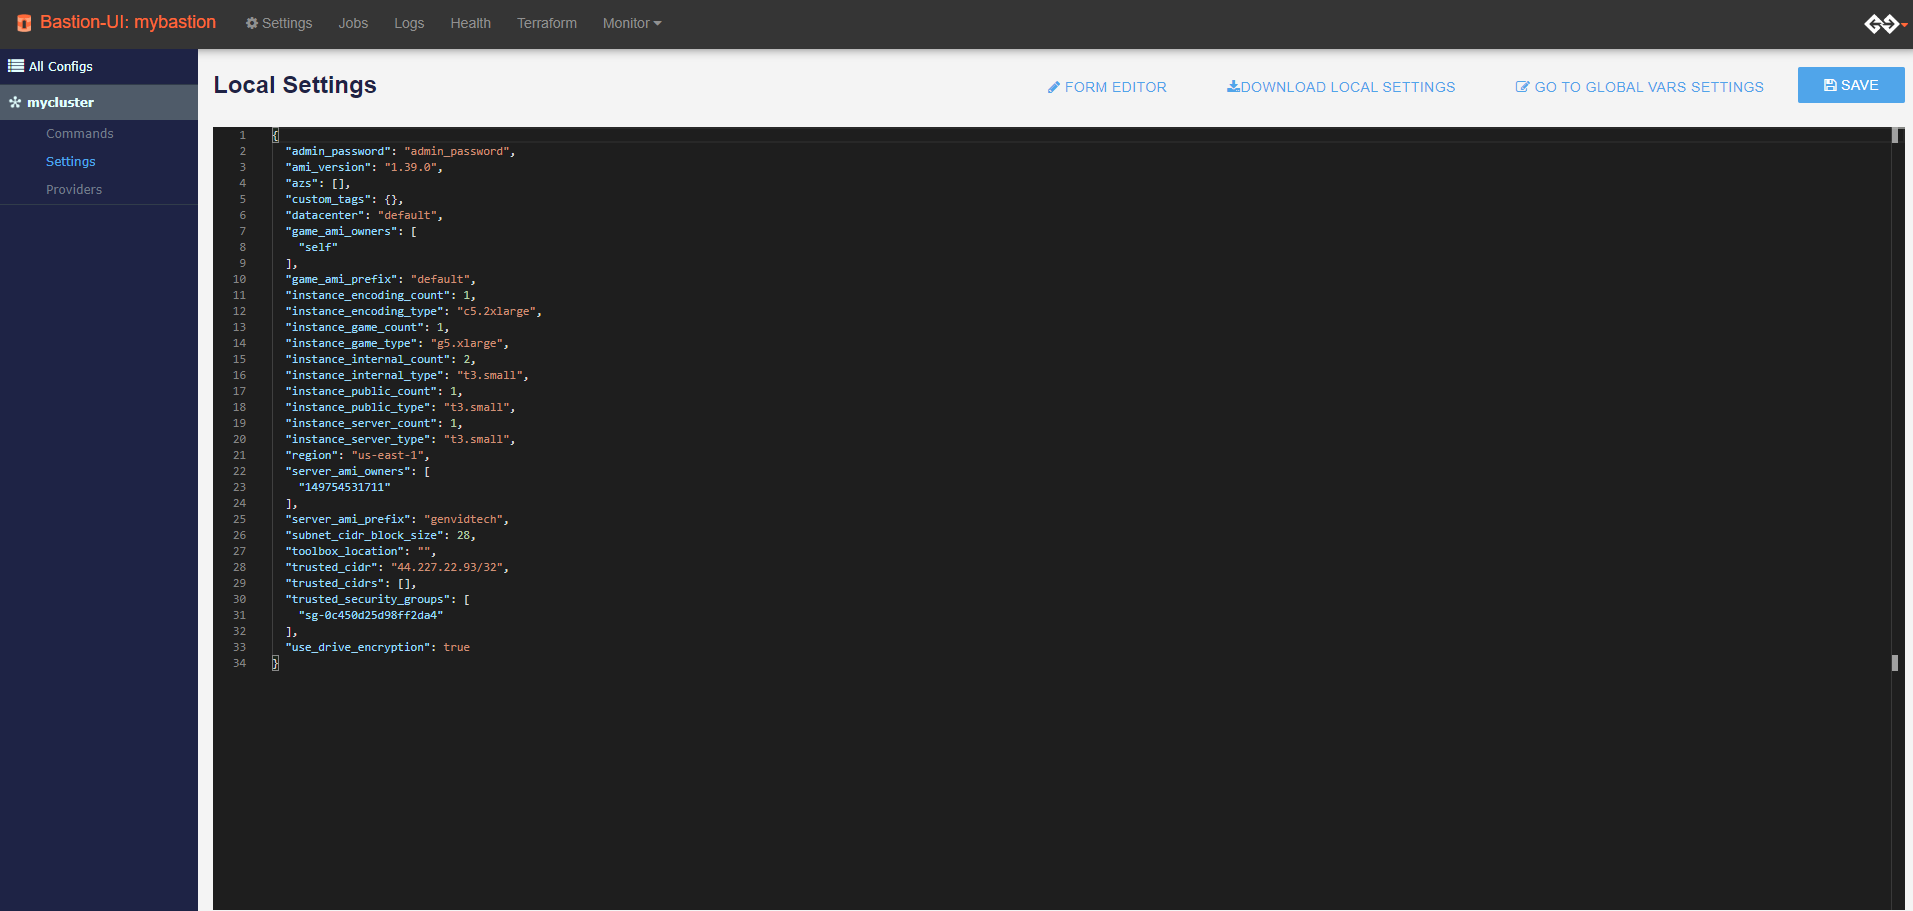
By clicking on Form Editor, we can go back to the form anytime.
Edited values will persist while toggling between the editors and could be saved at once by clicking on Save.
Jobs
This page is where you manage the jobs in the bastion cluster. From here you can:
See the status of each job.
Start and stop the stacks and jobs.
Go to the corresponding hashi-ui Job page.

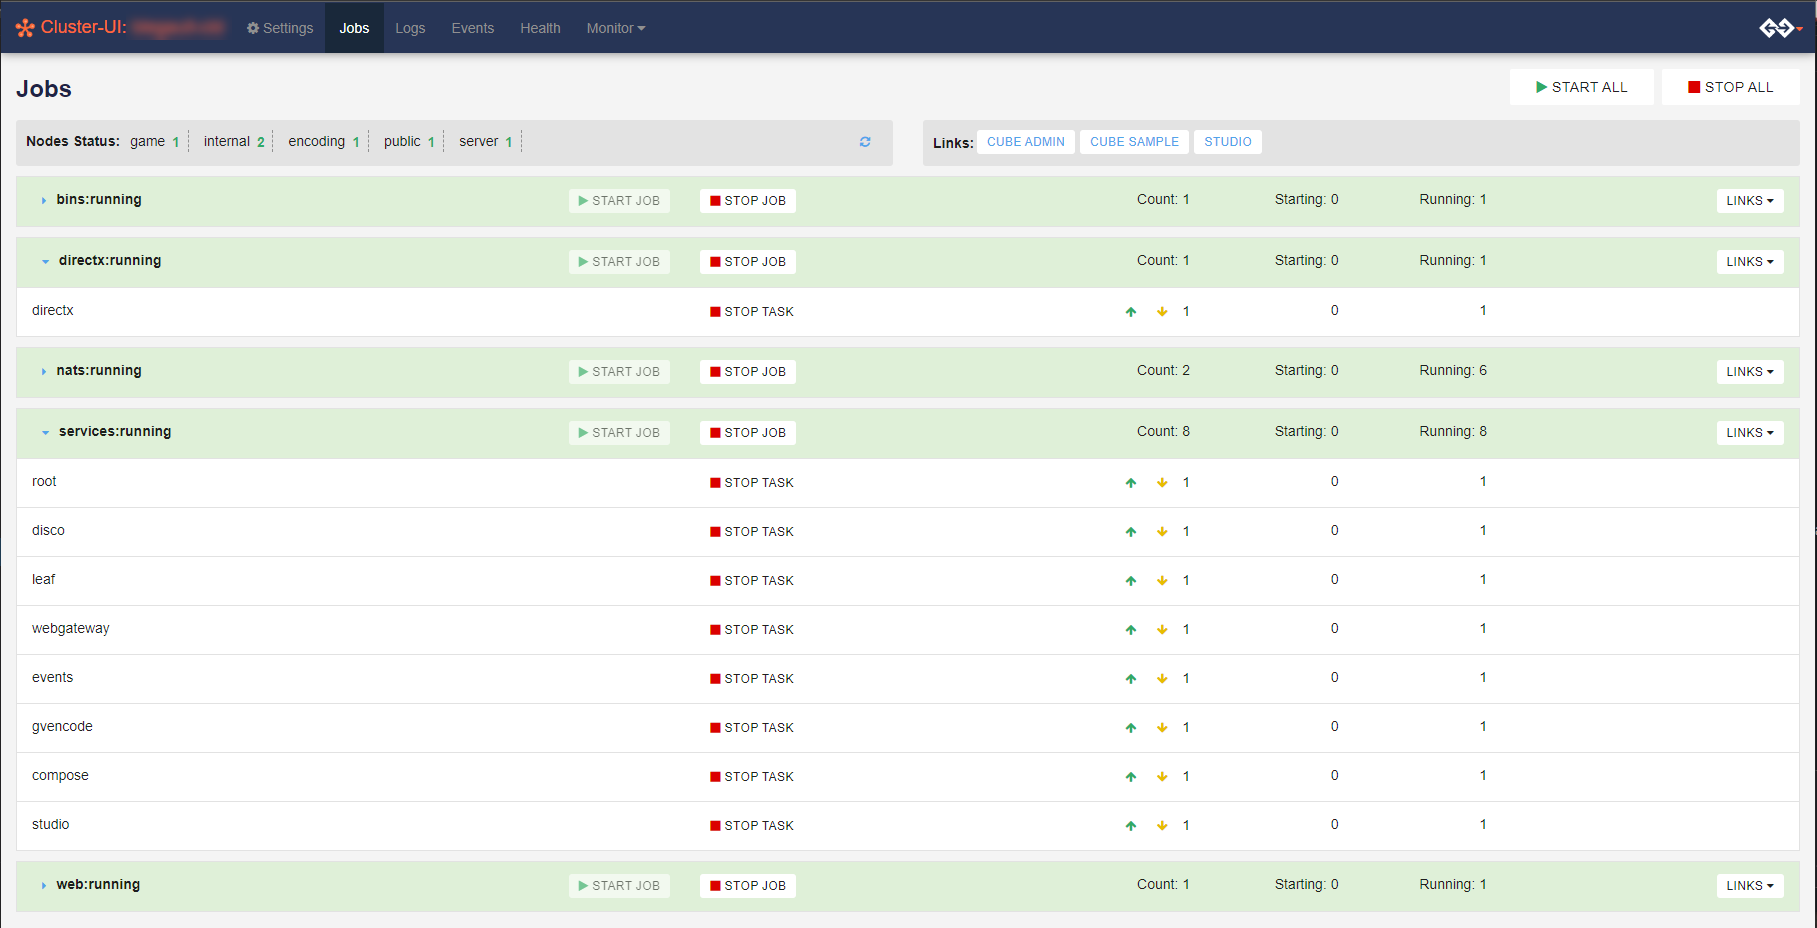
On the picture above, all the jobs are running and their statuses are shown as ‘running’. If one of more services fail to start and all restart attempts fail, the job will be shown as ‘dead’. No more automated attempts will happen for the services of a ‘dead’ job. However, once the root cause of the failure has been addressed, the service can be restarted manually. To do so, click on the dropdown button next to the job name. Find the service that is not running. Click on the yellow arrow pointing down, followed by the green arrow pointing up. The picture below shows a job with displayed services and up/down arrows to be used in this scenario.
To edit the jobs:
Click Settings to open the Settings page.
Go to the to the Jobs section.
The Jobs Setting page shows the settings for all configured jobs. From here you can:
Click Download to download a job template. The template is in text format with the
.nomad.tmplextension.Edit or delete job configurations.

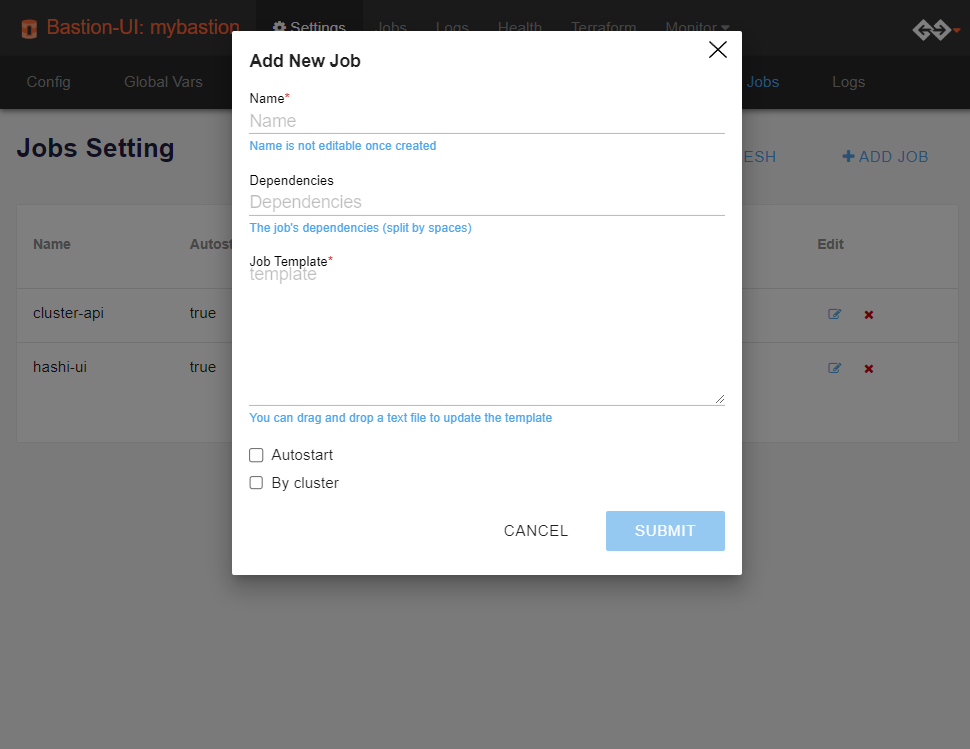
Click + ADD JOB to open the Add new job dialog.
- Name
The name of the job should match both the name of the template file and the name of the job in the template file.
- Dependencies
A list of services to wait on before starting the job. The default is None.
- Autostart
Check this option if the job must automatically start on a start command without arguments.
- By cluster
Check this option if the job must be started for each cluster individually. This adds the Cluster ID to the job name.
- Cluster categories
Specify which cluster categories the jobs must run for. Only available if the By cluster option is checked.
- Template
Drag and drop an ASCII file here to update the template. The job name must be the same as the template name for the scripts to work correctly. See Nomad Templates for more information.
Logs
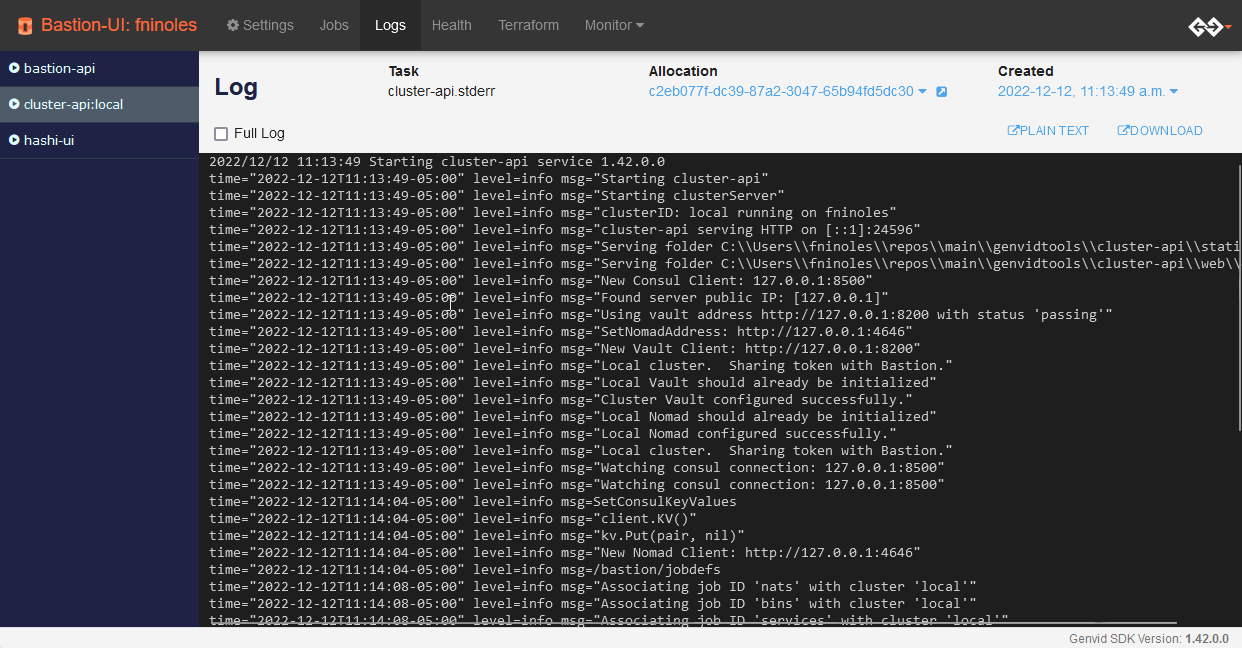
This page shows the available task-logs. The logs refresh automatically when the service is running. You can set the log level to either the default or per allocation level.
To edit the logs:
Click Settings to open the Settings page.
Go to the Logs section.
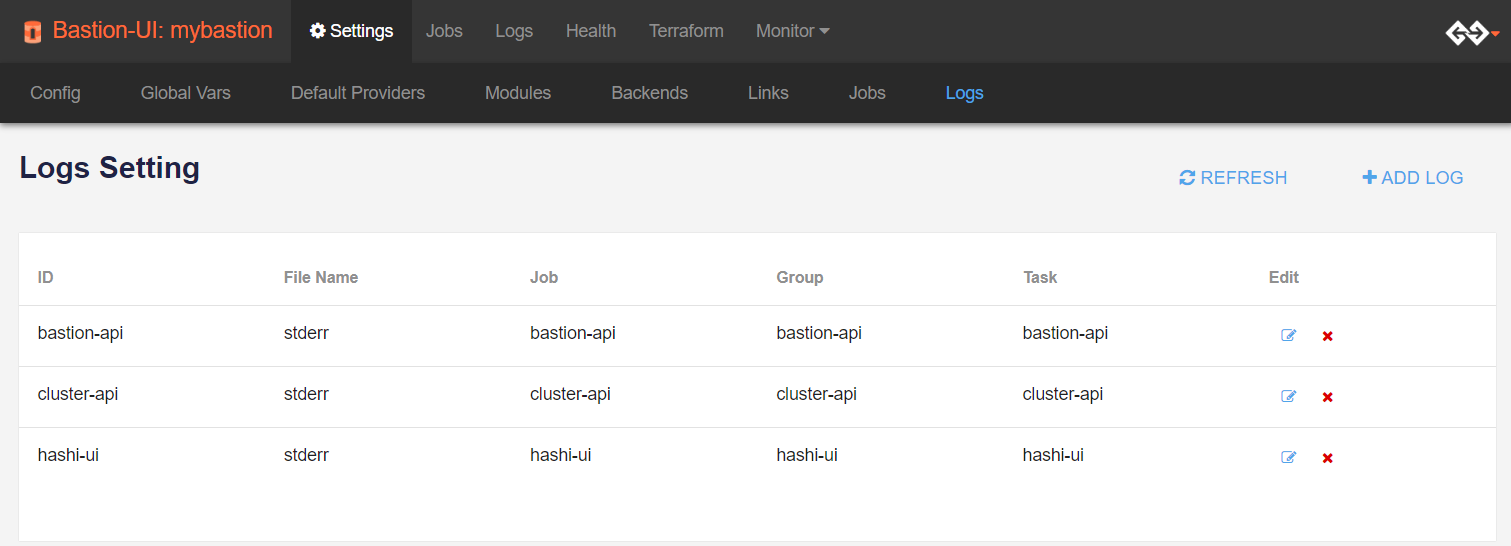
Click +ADD LOG to open the Add New Log dialog.
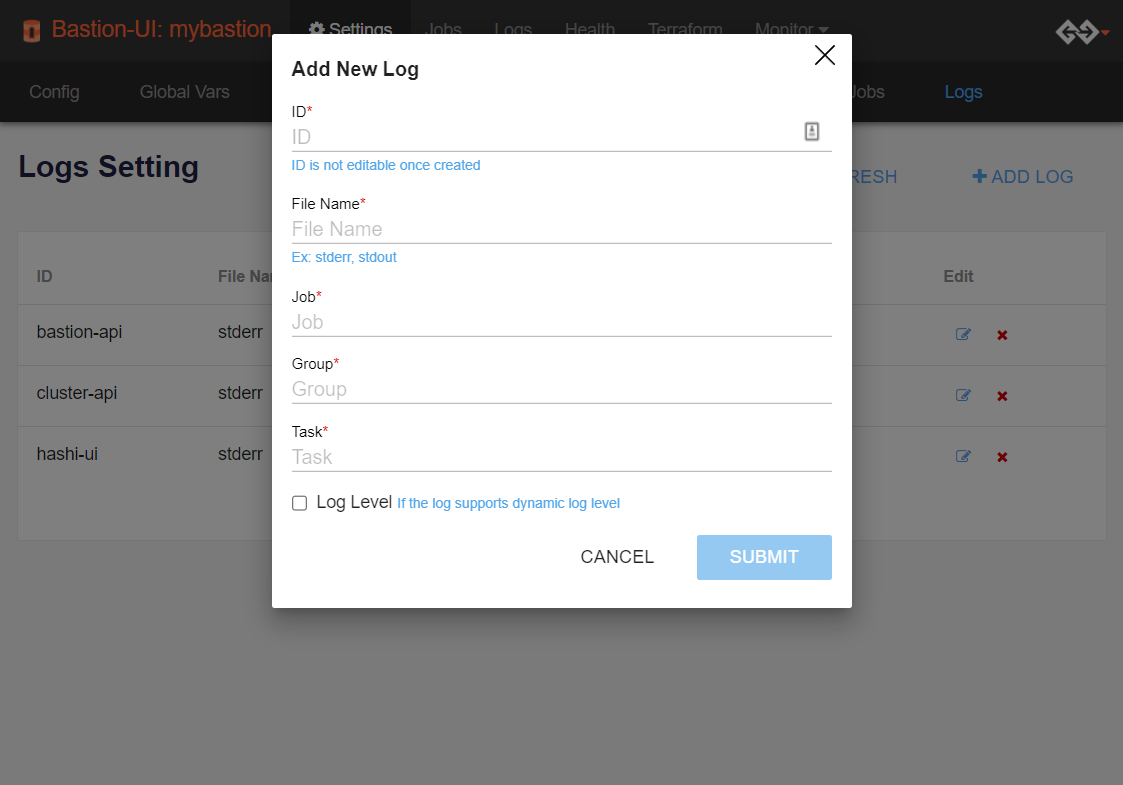
- ID
A unique ID for the log. Once the ID is created, it can’t be changed.
- File Name
The file name for the saved log. Example: stderr, stdout.
- Job
The ID of the job being logged. If the job is configured by cluster, the log name includes the cluster ID.
- Group
The ID of the task group.
- Task
The ID of the task.
- Log Level
Check this option if the log should support dynamic log levels. Levels change the amount of information logged. The log level can be debug, info, warning, error, fatal, or panic.
Health
This page displays the health of all services.
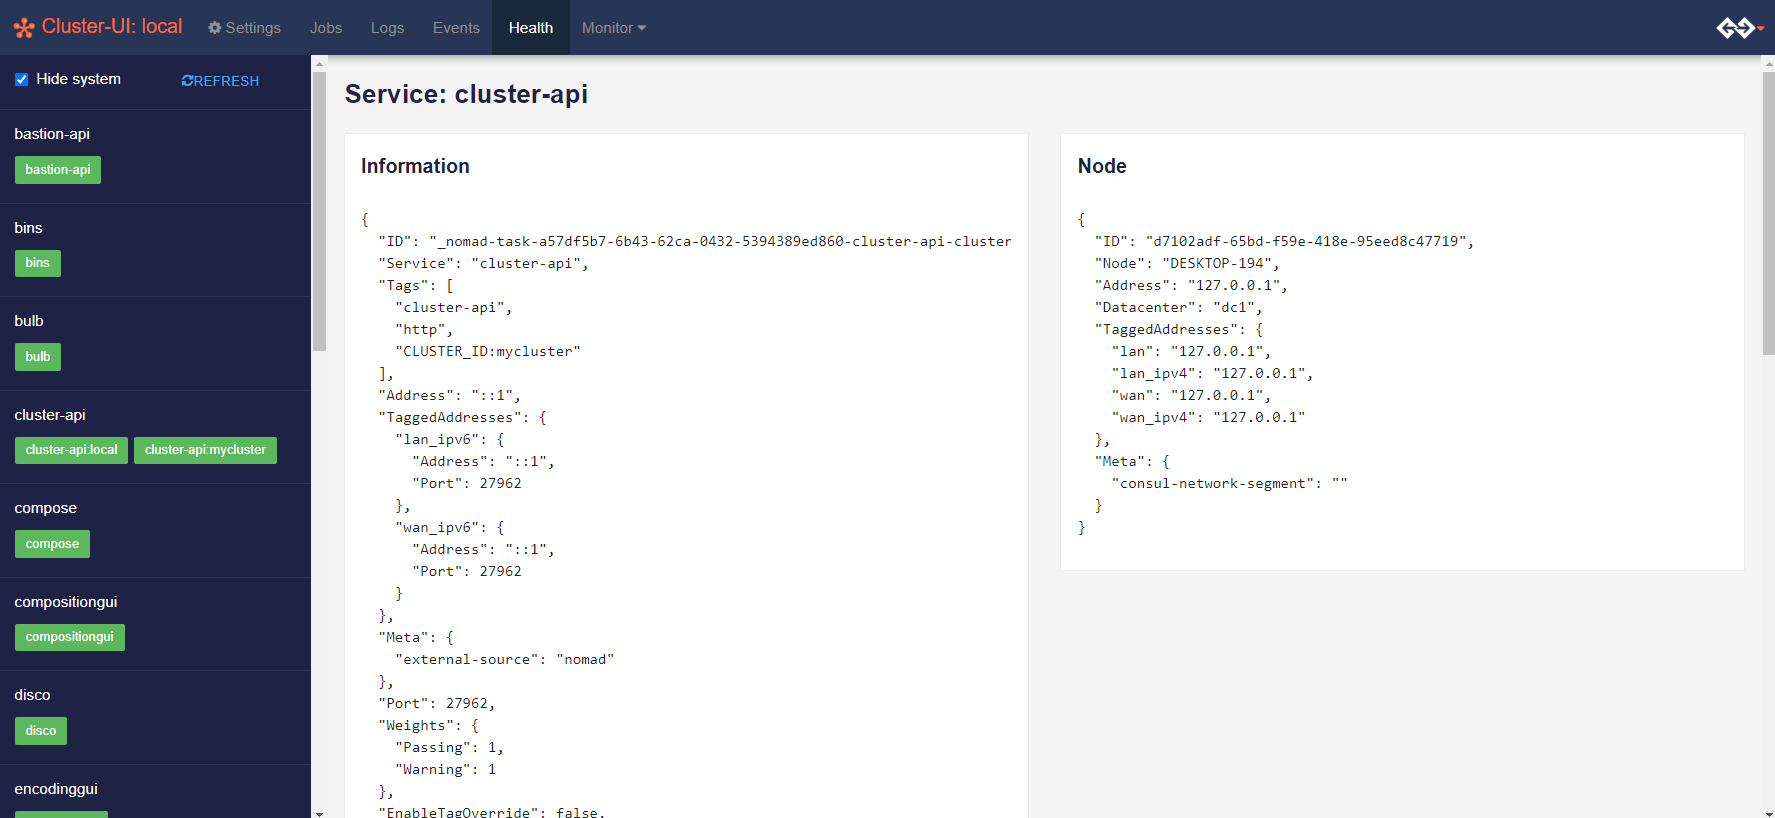
The left column shows the services and their instances. The instances have different colors according to their health.
Green: All the health checks are passing.
Orange: At least one health check is in a working state.
Red: At least one health check is in a critical state.
On this page you can:
Hide the system services to focus on the important services.
Refresh the status.
Click on a service instance to see its details.
Clicking a service will display its information in the detail section.
- Information
Details about the service.
- Node
The node the service is running on.
- Checks
The health checks for this service.
