Twitch Setup
You can use the Genvid MILE SDK to add interactive elements to your Twitch channels. Like other integrations, you can embed your Twitch broadcast into a custom website with interactive elements provided in an overlay. You can also create a Twitch Extension where its interactive elements are driven by Genvid on the backend.
Creating a Twitch Account
If you don’t already have a Twitch account, you’ll need to create one to develop with Genvid for the Twitch service.
The simplest way to create a new Twitch account is to visit https://www.twitch.tv/ and click the Sign Up button in the top right corner.
Follow these steps and you should have a Twitch account in no time.
Configuring Live Streaming
Important
When using Twitch as the broadcast service you may encounter imprecise or inconsistent synchronization performance. This performance is between the overlay and video stream and may be as much as 150ms of desynchronization right after starting the stream, often with game data ahead of video.
We also found that the amount of desynchronization increases with the duration of the stream. For example, you may initially see a 90ms (3 frames) offset after loading a Twitch extension page. However, after 2 hours watching this channel it grows to as much as 500ms. This will resolve with a refresh.
Because there’s no way to predict or measure the potential offset, the Genvid SDK doesn’t include a setting or tool which can compensate for it.
This may not be an issue for some overlay experiences. The desynchronization becomes far more obvious in experiences requiring the overlay to track an object moving on-screen. This is also an issue when you have a fixed object but the camera is moving.
You might be able to mitigate these types of problems through your design; for example, by modifying camera behavior. We recommend you begin testing your overlay directly in Twitch during the design phase, as these issues won’t be discovered using the Genvid MILE SDK standalone player.
In conclusion, be careful when designing your overlay experience, as it may be highly dependent on the synchronization quality possible with any broadcast service. Test your overlay design early and often directly using your broadcast service of choice to improve your chances to avoid synchronization issues like this.
Now that your account is created, we need the “address”, the “stream key”, and the “channel name” for your configuration to work with your Twitch account.
Address Using rtmp://live.twitch.tv/app/ acts as a forwarder towards
the recommended ingest endpoints nearest you. If you prefer a specific server,
you can view the list of available regions at https://help.twitch.tv/s/twitch-ingest-recommendation
to select which one best suits your needs.
- Channel
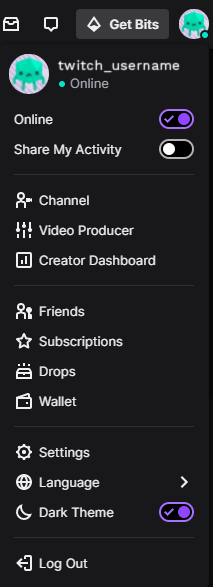
Your Twitch channel name is normally your username. To verify your channel name:
Go to https://www.twitch.tv.
Click your username to open the drop-down menu.
Select Channel.
This displays your channel page. Your channel name is the part of the page URL following https://www.twitch.tv.

Fig. 30 Twitch drop down menu
- Stream key
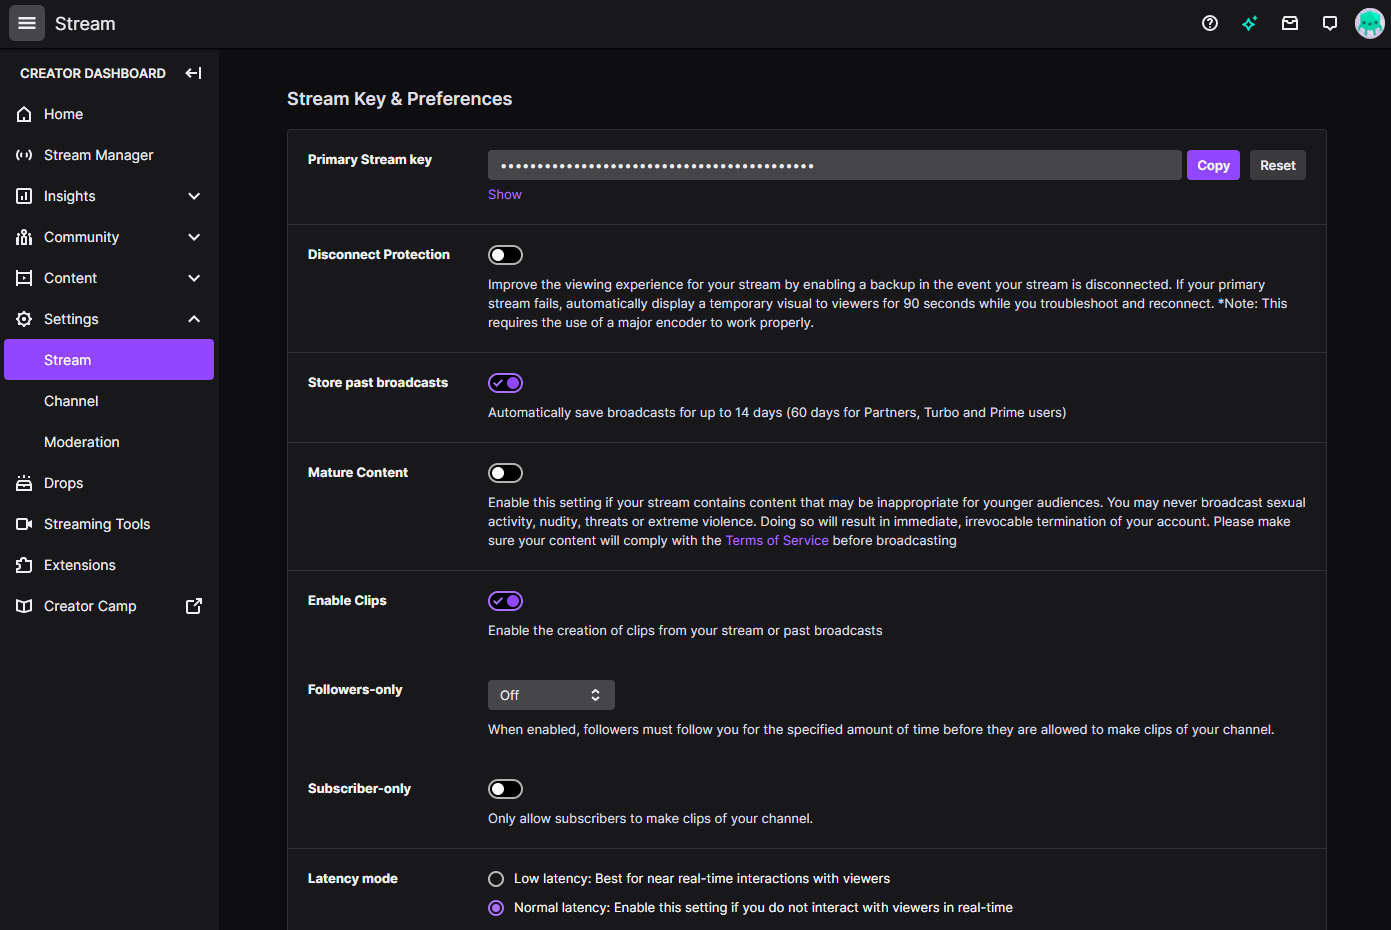
- The stream key is found in your Twitch dashboard.
Go to https://www.twitch.tv.
Click your username to open the drop-down menu.
Click Creator Dashboard.
Click on the left side of the page.
The key will be hidden in the Primary Stream key field.
Click Show.
Click I Understand.
Your stream key is the entire string shown in the Primary Stream key subsection.

Fig. 31 Twitch Channel Settings
Settings
Once you have all the information above, you can edit your configuration file. The result should be set to the following:
version = "1.7.0"

settings {
    encode {
    stream {
      enable  = true
      service = "twitch"
      // YOU MUST CHANGE THE ADDRESS, CHANNEL AND KEY VALUE
      addr    = "rtmp://<twitch-ingest-server>/app"
      channel = "channelname"
      key     = "live_NNNNNNNN_XXXXXXXXXXXXXXXXXXXXXXXXXXXXXX"
    }
  }
    leaf {
    port = 30001
  }
} // end of settings

link "button" {
  name     = "Twitch Channel"
  template = "http://twitch.tv/${key `genvid/encode/stream/channel`}"
} // end of link "twitch"

config {
  embed_ssl {
    enabled = true
  }
} // end of config
Alternatively, once your Cluster UI is up, you can manually enter this information in the Settings page.
Warning
Whether you’re using SSL on a cloud or a local cluster, if you load
twitch.sample.hcl before loading the web sample, the web sample
will overwrite the value associated with the embed_ssl from the
web.hcl file.
